17 mag 2020

Top 20 Android Spy Apps That Will.Make U Fell Like A Dectitive

             Top 10 Best android spy apps.                 

t's worth to note that there are plenty of Android spy apps available on the Google Play Store, but mentioning all of them is not possible. So, in this article, we have listed the one that's popular and used by many. So, let's explore the list of best spy apps 2019.

#1 Spy Camera OS

Spy Camera OS

This app permits users to capture images secretly. This app provides a smart way to shoot photos with a hidden camera interface so people wouldn't notice that you are taking pictures of them. Also, every sound and flash etc get disabled in this app.

#2 Ear Spy

Ear Spy

This is an awesome app to record even low voices. By this app, you can place your phone in the other room and can listen to the voices of that room by your Bluetooth handset. This app actually records the sound and then amplifies its recording and give you the amplified clear voices.

#3 Ip Cam Viewer

Ip Cam Viewer

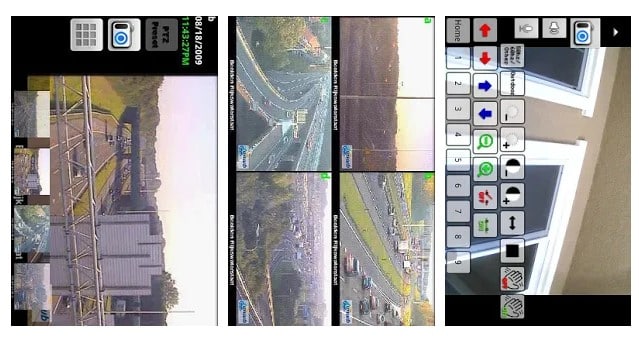
This awesome app allows to remotely view and control your IP Camera, DVR, Network Video Recorder, traffic cameras, CCTV or WebCam from an android device. In its new version, you can also get the notification on detecting motion on the device. This app can automatically start recording whenever it detects motion.

#4 Automatic Call Recorder

Automatic Call Recorder

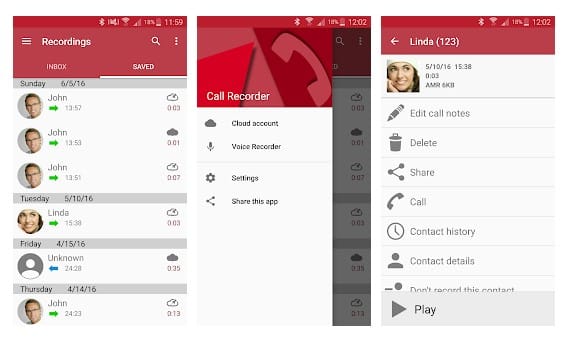
This is another best Spy App that one can have on their Android smartphone. This app gets automatically launched whenever you make or receive any call. It records all the conversation b/w speakers and also the surrounding noise of the device in which it is installed.

#5 Monitor Call Sms Location

Monitor Call Sms Location

This is another good spy app to remotely monitor SMS, Photo, Location, call logs and many more things on an Android device. This will exact location of the targeted device through a web-portal even if GPS disabled on the target device. The app comes with the three-day free trial option.

#6 Anti Spy Mobile

Anti Spy Mobile

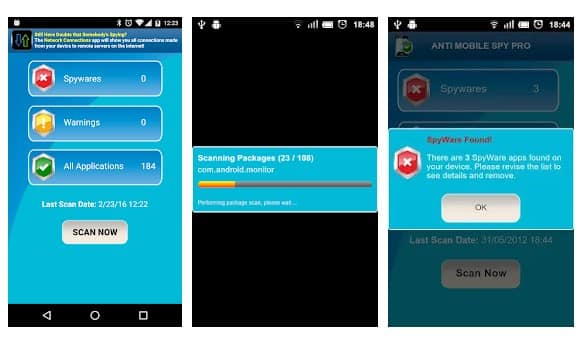
You don't know whether you had installed any spyware software on your phone? Use this app to instantly find the spyware. The Android app uses advanced detection techniques to detect new spyware. So, with this app, you can easily protect yourself from Android spyware.

#7 Hidden Eye

Hidden Eye

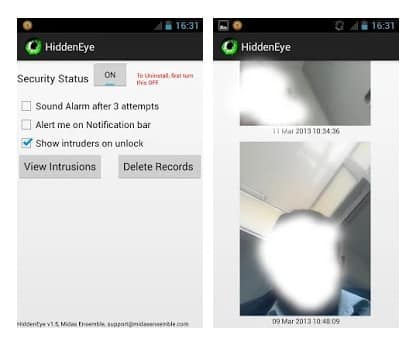
Ever wanted to know who tried snooping on your phone while you were away. Your friends or family member might have tried to unlock your phone. Hidden Eye is a simple app with no frills that will photograph the person when they try to unlock your phone.

#8 AppLock

AppLock

Applock is the most downloaded app lock in Play Store. Protect privacy with password, pattern, fingerprint lock. AppLock can lock Facebook, Whatsapp, Gallery, Messenger, SMS, Contacts, Gmail, Settings, incoming calls and any app you choose. Prevent unauthorized access and guard privacy. Ensure security.

#9 Hide Calls Automatically

Hide Calls Automatically

With this app, all outgoing, incoming and missed calls coming from private contacts will be deleted automatically from calls Log of your phone! No icon of this app will appear in your list of applications on your phone.

#10 Truecaller: Caller ID & Dialer

Truecaller

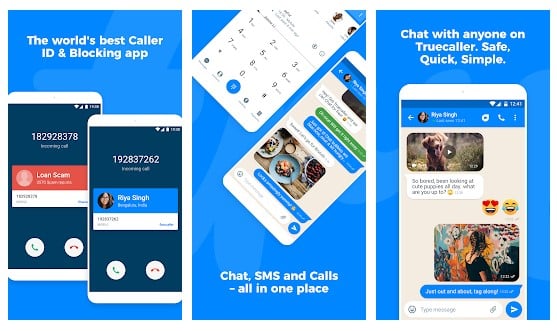
Truecaller is the only dialer you'll ever need with the ability to identify unknown callers and block unwanted calls. See names and photos of people who call, even if they aren't saved in your phonebook. And know when friends are free to talk, making your calling experience smarter and more delightful.

#11 Cell Tracker

Cell Tracker

You can use the cell tracker Android app to keep track of the location of your smartphone. With the help of this app, you can track all the locations you have visited in the last few days with your Android phone. To check the locations visited you have to launch the app and click on "View Now". No need to turn on the GPS.

#12 Secret Calls

Secret Calls

With the help of this app, all outgoing, Incoming and Missed Calls coming from private contacts will be deleted automatically from Calls Log of your phone! No icon of this app will appear in your list of applications on your phone.

#13 Spy Camera

Spy Camera

This is another Spy app on the list which provides one-touch to capture image feature. The app actually has lots of useful features. With the help of this app, you can find your lost phone because this app allows you to set up a number. When you lost your phone, just SMS to this phone and it will take a picture and upload to drive.

#14 Truecaller

Truecaller

Truecaller is a popular Android app which is used every day to identify unknown calls, block spam calls and spam SMS. It filters out the unwanted and lets you connect with people who matter.

#15 Whoscall – Caller ID

Whoscall - Caller ID

Whoscall, the best caller ID App that identifies unknown calls and blocks annoying spams, robocall & telemarketing with more than 50 million downloads and over 1 billion numbers data. It also got the call blocker that can be used to blacklist or whitelist contacts stored on your smartphone.

#16 Norton Family parental control

Norton Family parental control

Norton Family parental control is basically an Android app that is meant to keep kids safe online. However, this is nothing sort of a spy app. The app can help you to supervise online activity. You can easily keep track of sites which your friend visit and what they search if you install Norton Family Parental control on their phone.

#17 Smart Hide Calculator

Smart Hide Calculator

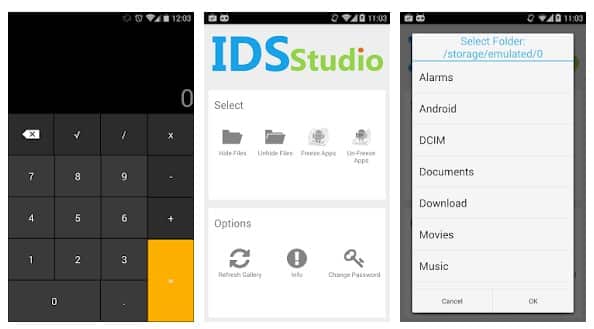
The app doesn't help users to spy on others. But, it can give you a detective type feeling. Smart hide calculator is a fully functional calculator app but with a little twist. Once you enter the password and press the '=' button then boom you are presented to an interface where you can hide, unhide pictures, videos, documents or files with any file extension.

#18 Hidden Eye

Hidden Eye

Ever wanted to know who tried snooping into your phone while you were away. Your friends or family member might have tried to unlock your phone. Hidden Eye is a simple app with no frills that will photograph the person when they try to unlock your phone.

#19 Background Video Recorder

Background Video Recorder

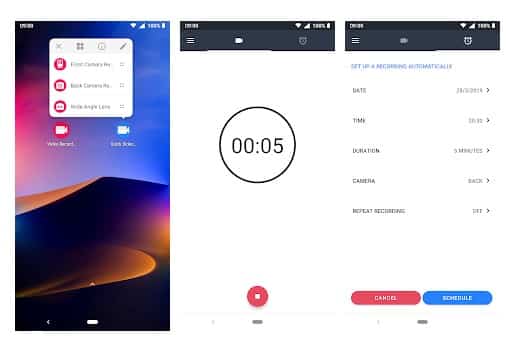
This is another best Android spy app that helps users to record what's happening behind them. Background Video Recorder is basically a camera app that records videos silently on the background. The app eliminates the camera shutter sounds, camera previews and it can also record videos when the screen is off.

#20 Kids Place

Kids Place

Kids Place is another best parental control app in the list and its meant to protect your kids' online activities. However, if you don't have kids, you can use the app to track other devices. The app gives you full control over other devices and you can control everything including calls, text, internet browsing, apps, etc.

@EVERYTHING NT

Related news


How To Install Windscribe - The Best Free VPN On GNU/Linux Distros?


Why should you use Windscrive?
   Windscribe is well-known for their free VPN service but they also have a paid version. Only with a free account, you will get 10 countries to connect through and change your real IP address and 10GB of free traffic (if you use an email to sign up Windscribe), and unlimited devices.

   The Free version is awesome, but the Pro one is even better! With Pro version you will get Unlimited DataUnblock over 60 Countries and 110 CitiesConfig Generator (OpenVPN, IKEv2, SOCKS5), and full protection from R.O.B.E.R.T.

   For your information, Windscribe is one of the best VPN services in the category Free AuditValue Audit and Overall Audit in BestVPN.com Awards 2019 (Read the White Paper here). You totally can believe in Windscribe (100% no logs).

   And about R.O.B.E.R.T, it's an advanced DNS level blocker that protects you from MalwareAds and TrackersSocial trackingPornGamblingFake NewsClickbait and Cryptominers. Read more about R.O.B.E.R.T.


Anyway, Windscribe helps you:
  • Stop tracking and browse privately: Governments block content based on your location. Corporations track and sell your personal data. Get Windscribe and take back control of your privacy.
  • Unblock geo-restricted content: Windscribe masks your IP address. This gives you unrestricted and private access to entertainment, news sites, and blocked content in over 45 different countries.
  • Take your browsing history to your grave: Protect your browsing history from your network administrator, ISP, or your mom. Windscribe doesn't keep any logs, so your private data stays with you.
  • Stop leaking personal information: Prevent hackers from stealing your data while you use public WIFI and block annoying advertisers from stalking you online.
  • Go beyond basic VPN protection: For comprehensive privacy protection, use our desktop and browser combo (they're both free).

   Windscribe also supports Chrome browser, Firefox browser, Opera browser, Smart TV, Routers, Android, iOS, BlackBerry, Windows OS, Mac OS X and GNU/Linux OS, you name it.

   You can install Windscribe on Ubuntu, Debian, Fedora, CentOS, Arch Linux and their based distros too.

   But to install and safely use Internet through Windscribe, you must sign up an account first. If you already have an account then let's get started.

How to install Windscribe on Arch and Arch-based distros?
   First, open your Terminal.

   For Arch Linux and Arch-based distro users, you can install Windscribe from AUR. Run these commands without root to download and install Windscribe on your Arch:


   For other distro users, go to VPN for Linux - Windscribe choose the binary file that compatible with your distro (.DEB for Debian and Ubuntu based, .RPM for Fedora and CentOS based) and then install it.
dpkg -i [Windscribe .DEB package]
rpm -ivh [Windscribe .RPM package]


   Or you can scroll down to Pick Your Distro, click to the distro version you use, or click to the distro version that your distro is based on and follow the instructions.

   Now enter these commands to auto-start a and log in to Windscribe.

   Enter your username and password and then you can enjoy Windscribe's free VPN service.

How to use Windscribe on Linux?
   This is Windscribe list of commands (windscribe --help):
   If you want Windscribe to chooses the best location for you, use windscribe connect best.

   But if you want to choose location yourself, here is the list of Windscribe's locations:
   *Pro only
   Example, i want to connect to "Los Angeles - Dogg", i use windscribe connect Dogg.

   If you want to stop connecting through Windscribe use windscribe disconnect.

   For some reasons, you want to log out Windscribe from your device, use windscribe logout.

I hope this article is helpful for you 😃


Related word


Hacktronian: All In One Hacking Tools Installer For Linux And Android

Hacktronian Installation
   Termux users must install Python and Git first: pkg install git python
   Then enter these commands:
   You can watch the full installation tutorial here:


Hacktronian Menu:
  • Information Gathering
  • Password Attacks
  • Wireless Testing
  • Exploitation Tools
  • Sniffing & Spoofing
  • Web Hacking
  • Private Web Hacking
  • Post Exploitation
  • Install The HACKTRONIAN
Information Gathering menu:
Password Attacks menu:
Wireless Testing menu:
Exploitation Tools menu:
  • ATSCAN
  • SQLMap
  • Shellnoob
  • commix
  • FTP Auto Bypass
  • jboss-autopwn
Sniffing and Spoofing menu:
Web Hacking menu:
  • Drupal Hacking
  • Inurlbr
  • Wordpress & Joomla Scanner
  • Gravity Form Scanner
  • File Upload Checker
  • Wordpress Exploit Scanner
  • Wordpress Plugins Scanner
  • Shell and Directory Finder
  • Joomla! 1.5 - 3.4.5 remote code execution
  • Vbulletin 5.X remote code execution
  • BruteX - Automatically brute force all services running on a target
  • Arachni - Web Application Security Scanner Framework
Private Web Hacking:
  • Get all websites
  • Get joomla websites
  • Get wordpress websites
  • Control Panel Finder
  • Zip Files Finder
  • Upload File Finder
  • Get server users
  • SQli Scanner
  • Ports Scan (range of ports)
  • ports Scan (common ports)
  • Get server Info
  • Bypass Cloudflare
Post Exploitation:
  • Shell Checker
  • POET
  • Weeman
Hacktronian's License: MIT Licence

That's It... If You Like This Repo. Please Share This With Your Friends. And Don't Forget To Follow The Author At Twitter, Instagram, Github & SUBSCRIBE His YouTube Channel!!!

Thank you. Keep Visiting.. Enjoy.!!! :)

More information


  1. 101 Hacking
  2. Curso De Hacking
  3. Hacking Con Buscadores
  4. Hacking Apps
  5. Etica Definicion
  6. Como Hacer Hacker
  7. Hacking Google Home Mini
  8. Curso Ethical Hacking
  9. Crack Definicion
  10. Seguridad Y Hacking
  11. Hacking Desde Cero
  12. Hacking Wireless 101 Pdf

Kali Linux VM Installation And Setup

Preface

From time to time I realize that certain tasks that are trivial for me are not necessarily easy for others, especially if they are just getting started with IT security stuff.

As I am going to be a Facilitator at SANS Munich 2015 on SEC 401, plus we have a few people at work who are just dipping their toe into the wonderful world of Kali Linux, it seemed like a good opportunity to make a short getting started / installation guide on the Kali VMWare VMs that you can download and quickly get started.

On top of that, when I check the statistics of the blog, I always see that the most popular posts are the detailed howtos and tutorials and I assume that it is because there is a need for this kind of posts too, so here it goes! :)


Step -1: Check in your BIOS/UEFI if virtualization is enabled

We are going to use virtualization, so it would be nice to enable it, right?

In BIOS/UEFI menus this is somewhere around "Security" and/or "Virtualization" and it is something like "Intel (R) Virtualization Technology" and "Intel (R) VT-d Feature" that needs to be set to "Enabled".


Step 0: Install VMWare Player or VMWare Workstation

The Kali Linux VMs are VMWare-based, so you need to install VMWare Player (free), VMWare Workstation (paid) or VMWare Fusion (paid, for OS-X).

The more desirable choice is to use VMWare Workstation or VMWare Fusion, as they have a Snapshot feature, while with VMWare Player, you are forced to take a full copy in order to have a sort of rollback feature.


Step 1: Download Kali VM

We need to download the Kali VMs from the "Custom Kali Images" download site, where you can find a 64 bit (amd64) and a 32 bit PAE (i686) too.

There are also Torrent files for the images and based on experience, using Torrent is much more faster and reliable than the HTTP download, so if you can, use that!

Once you have downloaded the VMs, do not forget to check their SHA1 hash!!! On Linux, you can simply use the sha1sum command at a terminal. For Windows, you can use something like the MD5 & SHA Checksum Utility.


Step 2: Change Kali VM default root password

The Kali VM comes with a preset root password, which is "toor" (without the quotes), therefore, it has to be changed.

Here is how you do it:
root@kali:~# passwd
Enter new UNIX password:
Retype new UNIX password:
passwd: password updated successfully


Step 3: Change Kali VM default SSH keys

The Kali VM also comes with SSH preinstalled, so we need to change the SSH keys to avoid SSH MiTM attacks.
Here is how you do it:
root@kali:~# cd /etc/ssh/
root@kali:/etc/ssh# mkdir default_kali_keys
root@kali:/etc/ssh# mv ssh_host_* default_kali_keys/
root@kali:/etc/ssh# dpkg-reconfigure openssh-server
Creating SSH2 RSA key; this may take some time ...
Creating SSH2 DSA key; this may take some time ...
Creating SSH2 ECDSA key; this may take some time ...
insserv: warning: current start runlevel(s) (empty) of script `ssh' overrides LSB defaults (2 3 4 5).
insserv: warning: current stop runlevel(s) (2 3 4 5) of script `ssh' overrides LSB defaults (empty).

Now we can check if the keys are really changed:

root@kali:/etc/ssh# md5sum /etc/ssh/*key*
md5sum: /etc/ssh/default_kali_keys: Is a directory
6abe210732068fa7ca95854c3078dba5 /etc/ssh/ssh_host_dsa_key
1b5f3c1a1b5c48cc3cce31b116e8b6f8 /etc/ssh/ssh_host_dsa_key.pub
8f0f60855e5ab8cac8103d64faab090f /etc/ssh/ssh_host_ecdsa_key
aace49ae9236815c9a1672f8ecb2b1e2 /etc/ssh/ssh_host_ecdsa_key.pub
cf861a9f743fb4584ab246024465ddf1 /etc/ssh/ssh_host_rsa_key
d5d65d8ad023a6cb1418ae05007bc6d3 /etc/ssh/ssh_host_rsa_key.pub
root@kali:/etc/ssh# md5sum /etc/ssh/default_kali_keys/*key*
c8d5b82320a4ddde59d0e2b6d9aad42a /etc/ssh/default_kali_keys/ssh_host_dsa_key
6b12ddecd463677cde8097e23d0f219a /etc/ssh/default_kali_keys/ssh_host_dsa_key.pub
fecf056571a3dfbf3635fc2c50bf23c5 /etc/ssh/default_kali_keys/ssh_host_ecdsa_key
e44b7c50635de42e89b3297414f5047d /etc/ssh/default_kali_keys/ssh_host_ecdsa_key.pub
e9e0267484e020878e00a9360b77d845 /etc/ssh/default_kali_keys/ssh_host_rsa_key
ceee93d7bbc9f9b9706e18f23d4e81f1 /etc/ssh/default_kali_keys/ssh_host_rsa_key.pub

Step 4: Update Kali VM

Next you need to update your Kali VM so that everything is patched.

Here is how you do it:

root@kali:~# apt-get update
Get 1 http://http.kali.org kali Release.gpg [836 B]
Get:2 http://security.kali.org kali/updates Release.gpg [836 B]
********************************* SNIP *********************************
Fetched 16.7 MB in 14s (1,190 kB/s)
Reading package lists... Done
root@kali:~# apt-get upgrade
eading package lists... Done
Building dependency tree
Reading state information... Done
The following packages have been kept back:
********************************* SNIP *********************************
The following packages will be upgraded:
********************************* SNIP *********************************
241 upgraded, 0 newly installed, 0 to remove and 16 not upgraded.
Need to get 740 MB of archives.
After this operation, 130 MB disk space will be freed.
Do you want to continue [Y/n]? Y
Get:1 http://security.kali.org/kali-security/ kali/updates/main libc6-i386 amd64 2.13-38+deb7u7 [4,044 kB]
Get:2 http://http.kali.org/kali/ kali/main base-files amd64 1:1.1.0 [77.5 kB]
********************************* SNIP *********************************
root@kali:~#


Step 5: Create a Snapshot/Copy the VM

Once you are done with all the above, you can make a Snapshot in case of VMWare Workstation or copy the files of the VM in case of VMWare Player, so that you can roll back to this clean stat in case you misconfigure something.

Hope this was helpful. Happy hacking!


More information


16 mag 2020

Linux Command Line Hackery Series: Part 2


Welcome back to Linux Command Line Hackery, yes this is Part 2 and today we are going to learn some new skills. Let's rock

Let us first recap what we did in Part 1, if you are not sure what the following commands do then you should read Part 1.

mkdir myfiles                                                # make a directory (folder) with myfiles as name
cd myfiles                                                      # navigate to myfiles folder
touch file1 file2 file3                                    # create three empty files file1file2file3
ls -l                                                                   # view contents of current directory
echo This is file1 > file1                               # write a line of text to file1
cat file1                                                           # display contents of file1
echo This is another line in file1 >> file1    # append another line of text to file1
cat file1                                                          # display the modified content of file1

Command:  cp
Syntax:        cp source1 [source2 ...] destination
Function:     cp stands for copy. cp is used to copy a file from source to destination. Some important flags are mentioned below
Flags:          -r copy directories recursively
                     -f if an existing destination file cannot be opened, remove it and try  again

Let us make a copy of file1 using the new cp command:

cp file1 file1.bak

what this command is going to do is simply copy file1 to another file named file1.bak. You can name the destination file anything you want.
Say, you have to copy file1 to a different folder maybe to home directory how can we do that? well we can do that like this:

cp file /home/user/

I've used the absolute path here you can use whatever you like.
[Trick: ~ has a special meaning, it stands for logged in user's directory. You could have written previous command simply as
cp file1 ~/
and it would have done the same thing.]
Now you want to create a new directory in myfiles directory with the name backup and store all files of myfiles directory in the backup directory. Let's try it:

mkdir backup
cp file1 file2 file3 backup/

this command will copy file1 file2 file3 to backup directory.
We can copy multiple files using cp by specifying the directory to which files must be copied at the end.
We can also copy whole directory and all files and sub-directories in a directory using cp. In order to make a backup copy of myfiles directory and all of it's contents we will type:

cd ..                                           # navigate to previous directory
cp -r myfiles myfiles.bak       # recursively copy all contents of myfiles directory to myfiles.bak directory

This command will copy myfiles directory to myfiles.bak directory including all files and sub-directories

Command: mv
Syntax:       mv source1 [source2 ...] destination
Function:    mv stands for move. It is used for moving files from one place to another (cut/paste in GUI) and also for renaming the files.

If we want to rename our file1 to  file1.old in our myfiles folder we'll do the follow:

cd myfiles                                      # navigate first to myfiles folder
mv file1 file1.old

this command will rename the file1 to file1.old (it really has got so old now). Now say we want to create a new file1 file in our myfiles folder and move the file1.old file to our backup folder:

mv file1.old backup/                    # move (cut/paste) the file1.old file to backup directory
touch file1                                    # create a new file called file1
echo New file1 here > file1         # echo some content into file1

Command:  rmdir
Syntax: rmdir directory_name
Function: rmdir stands for remove directory. It is used for removing empty directories.

Let's create an empty directory in our myfiles directory called 'garbage' and then remove it using rmdir:

mkdir garbage
rmdir  garbage

Good practice keep it doing. (*_*)
But wait a second, I said empty directory! does it mean I cannot delete a directory which has contents in it (files and sub-directories) with rmdir? Yes!, you cannot do that with rmdir
So how am I gonna do that, well keep reading...

Command:  rm
Syntax:        rm FILE...
Function:     rm stands for remove. It is used to remove files and directories. Some of it's important flags are enlisted below.
Flags:          -r remove directories and their contents recursively
                     -f ignore nonexistent files and arguments, never prompt

Now let's say we want to delete the file file1.old in backup folder. Here is how we will do that:

rm backup/file1.old                # using relative path here

Boom! the file is gone. Keep in mind one thing when using rm "IT IS DESTRUCTIVE!". No I'm not yelling at you, I'm just warning you that when you use rm to delete a file it doesn't go to Trash (or Recycle Bin). Rather it is deleted and you cannot get it back (unless you use some special tools quickly). So don't try this at home. I'm just kidding but yes try it cautiously otherwise you are going to loose something important.

Did You said that we can delete directory as well with rm? Yes!, I did. You can delete a directory and all of it's contents with rm by just typing:

rm -r directory_name

Maybe we want to delete backup directory from our myfiles directory, just do this:

rm -r backup

And it is gone now.
Remember what I said about rm, use it with cautious and use rm -r more cautiously (believe me it costs a lot). -r flag will remove not just the files in directory it will also remove any sub-directories in that directory and there respective contents as well.

That is it for this article. I've said that I'll make each article short so that It can be learned quickly and remembered for longer time. I don't wanna bore you.

Related articles